


Almond Solid Color Wine Red Soft Gel Press Ons
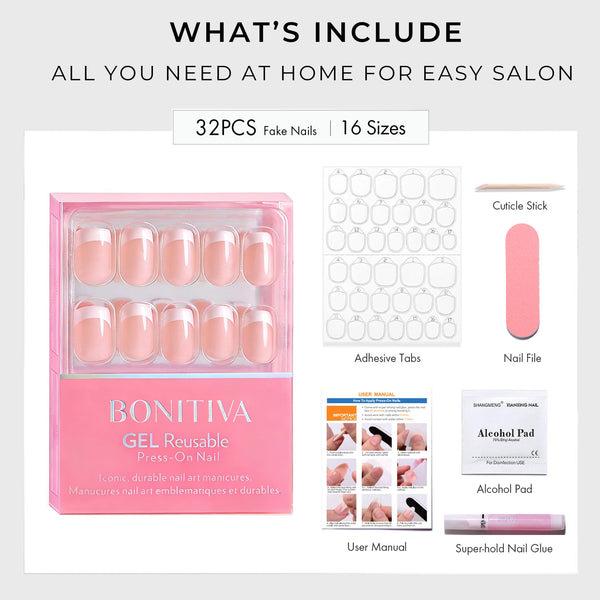
- ✓ 32 Press-On Nails & Complete Salon Kit
- ✓ Easy application & removal
- ✓ Innovative salon-quality gel formula
- ✓ Reusable
- ✓ Up to 28+ days of wear with nail glue
100% Money-back Guarantee
We’re confident in our quality and offer a 100% money-back guarantee.
Try BONITIVA completely risk-free for 30 days. If you’re not 100% satisfied, you’ll get your money back — no hassle, no conditions.


Product Details
Whether you’re a nail lover, a press-on regular, or just trying them for the first time, you’ve probably tried different options—but not all press-ons are created equal. That’s exactly why BONITIVA exists.
The 5-Minute At-Home Manicure
If you’re tired of press-ons that look fake, feel stiff, or fall off too quickly, BONITIVA Soft Gel Press Ons are made to change that. They give you the same glossy, natural look as a salon gel manicure—without the time, cost, or hassle.
What Makes Them Different
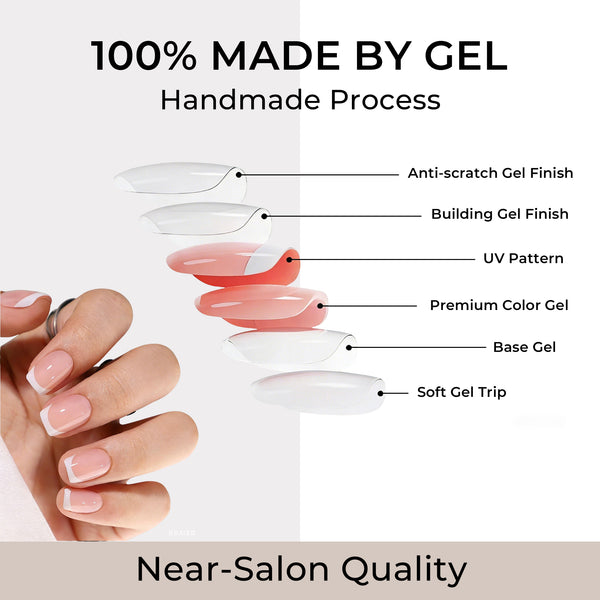
Crafted from premium soft gel, our nails are lightweight, flexible, and comfortable, yet strong enough to resist bending and breaking. The salon-inspired shape and ultra-glossy finish create a seamless, natural look that doesn’t feel like typical press-ons.
Long-Lasting & Reusable
Pair with BONITIVA glue for up to 28+ days of wear. No frequent fixes, no wasted sets. With proper removal, they’re fully reusable—making them a smarter, more cost-effective choice.
Easy Fit, Effortless Beauty
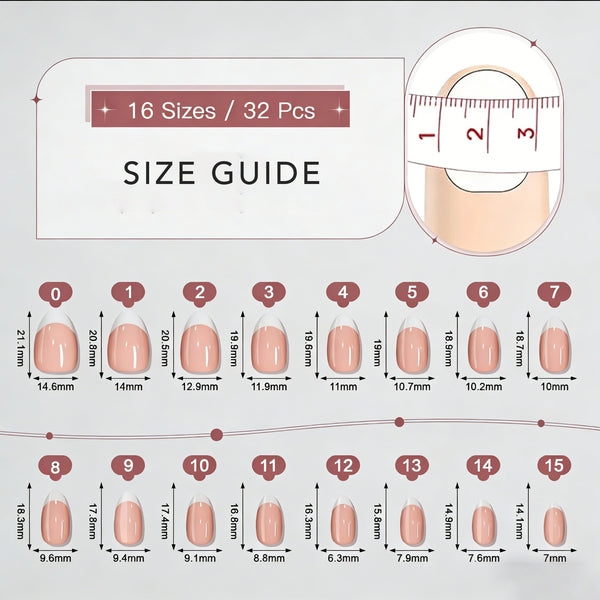
With 32 nails in 16 sizes, you’ll always find your perfect fit and achieve flawless nails in just 5 minutes.
Better fit, better feel, longer wear—this is press-on nails, upgraded.
Shipping & Returns
30-Day Easy Returns
We want you to feel confident trying BONITIVA. If something isn’t right, contact us within 30 days of delivery at service@bonitiva.com with your order number to start a return.
- Opened items are eligible (limit one opened item per customer)
- Unused items must be in original condition & packaging
- Return shipping is the customer’s responsibility unless the item is damaged, defective, or incorrect
- Refund issued to original payment method or store credit after inspection
Sale items, mystery boxes, bundles, and free gifts may have limited eligibility. Orders placed through other retailers must be returned to the original seller.
For more details, please see our Returns & Refund Policy.
How to Apply
Before You Begin
Open the package and gently separate the layers to reveal your press-on nails and application kit.
Inside the box, you’ll find everything needed for a complete application — including prep tools, alcohol pads, a nail file, and a rosewood stick. Keep all tools within reach before starting to make the process smooth and effortless.

Step 01 — Shape & Prepare Your Nails
Start by shaping your natural nails using the file. Then gently push back the cuticles with the rosewood stick to create a clean nail surface.

Step 02 — Lightly Buff & Clean
Buff the nail surface softly to remove natural shine and improve adhesion. Use the alcohol pad to remove dust, oil, and any remaining residue.

Step 03 — Find Your Perfect Fit
Select a press-on nail and place it gently over your natural nail. The correct size should sit flush along the sidewalls without touching the skin. If needed, file the edges slightly for a tailored fit.
Step 04 — Choose Your Wear Method
Adhesive Tabs — Flexible & Reusable (Up to 7 Days)
Choose the correct tab size and press it firmly onto your natural nail. Smooth out air bubbles using the rosewood stick and remove the protective film before applying the press-on nail.
Traditional Nail Glue — Longer Wear (Up to 14 Days)
Apply glue to the press-on nail and a thin layer to your natural nail, avoiding the cuticle area.
Step 05 — Apply the Nails
Position the nail at a 45-degree angle near the cuticle and slowly press downward. Hold firmly for about 60 seconds to ensure a secure bond.
Upgrade to 28+ Day Wear with BONITIVA Semi-Solid Nail Glue
If you’re looking for salon-level retention, BONITIVA Semi-Solid Nail Glue offers a stronger, longer-lasting bond designed for extended wear.
This air-drying formula sets in seconds without the need for a UV lamp and creates a waterproof, bubble-free seal that keeps press-on nails secure for up to 28 days.
For maximum durability and a truly long-lasting manicure, the semi-solid glue method is the professional choice.
How To Remove
How to Remove Press-On Nails Safely (Without Damaging Your Natural Nails)
Press-on nails are designed to be easy to wear and easy to remove — when done the right way. Removing them too quickly or forcing them can weaken your natural nails and irritate the cuticle area.
This guide walks you through the safest removal methods and how to care for your nails afterward.
Why Gentle Removal Matters
Your natural nails are made of delicate layers. Removing press-ons before the adhesive softens can lift these layers and leave nails thin, weak, or sensitive.
The most important rule is simple: never force removal. The adhesive must be softened first so the nails can slide off naturally.
Before You Start
Removal takes a little time, so get comfortable and prepare your tools in advance.
- Small bowl
- Warm water
- Dish soap
- Cuticle oil or natural oil
- Cuticle stick
- Nail file
- Towel
Plan for around 15–20 minutes of relaxed soaking time.

Method 1 — Warm Water Removal (Best for Reuse)
This gentle method helps preserve both your natural nails and your press-ons so they can be reused.
Step 1 — Prepare the soak
Fill a bowl with warm (not hot) water. Add a few drops of dish soap and a small amount of oil to help break down the adhesive while preventing dryness.
Step 2 — Soak nails
Place fingertips in the bowl and soak for 10–15 minutes until the adhesive begins loosening.
Step 3 — Gently lift
Use a cuticle stick to slowly lift around the sides of the nail until the press-on slides off. If you feel resistance, soak longer and try again.
Method 2 — Remove with BONITIVA Nail Glue Remover
For faster removal, BONITIVA Nail Glue Remover dissolves adhesive without acetone. The vitamin-enriched formula is designed to be gentle on both nails and skin.

Step 1 — Apply remover
Apply remover around the edges of each nail, especially near the cuticle and sides.
Step 2 — Create a small gap
Use a cuticle pusher or nail stick to gently lift the edge of the press-on.
Step 3 — Let it work
Apply more remover into the gap and wait about 20 seconds for the adhesive to dissolve.
Step 4 — Lift the nail
Carefully remove the press-on. It should slide off easily without force.
Step 5 — Remove leftover glue
Apply remover directly to any remaining adhesive and gently scrape it away.
Step 6 — Clean the nails
Finish by wiping nails with an alcohol pad.
Helpful Tips for Safe Removal
- If nails don’t lift easily, give the remover more time
- Avoid pulling or forcing nails off
- Warm environments help adhesive dissolve faster
- Patience protects your natural nails
Aftercare: Restore and Hydrate
After removal, your nails benefit from moisture and gentle care.
- Wash hands to remove residue
- Lightly buff remaining adhesive
- Apply hand cream
- Use cuticle oil to restore hydration
Healthy nails create the perfect base for your next set.
When Can You Apply Press-Ons Again?
If nails feel strong and healthy, you can reapply immediately. If they feel sensitive, allow a few days of hydration and rest before your next manicure.
Gentle removal keeps your nails strong, healthy, and ready for every new look.